A/B Testing and Mix Snapshots: A Practical Workflow to Prevent Overmixing
Table of Contents
Overmixing is one of the most common traps for new mixing engineers—and even seasoned veterans occasionally fall into it. You know the feeling: you tweak the EQ, compress a little more, automate one more thing, and suddenly your mix sounds worse than it did an hour ago.
A reliable way to avoid this is to build a snapshot habit: creating intentional milestones throughout your mixing process. In this article, we’ll explore the high-level concept of snapshot-based mixing, then walk through how to do it efficiently inside Opusonix.
1. The High-Level Concept: Why “Mix Snapshots” Prevent Overmixing
Overcooking a mix usually happens gradually. Each small tweak feels productive, but collectively they can cause ear fatigue, skew your judgment, or lead you down a rabbit hole of over-correction. The best safeguard is to regularly capture versions of your mix at key moments—moments when things sound good.
Here’s the idea:
Every time the mix feels right, bounce a snapshot.
Come back later with fresh ears, make improvements, then bounce again.
When in doubt, A/B your snapshots to find the strongest version.
This process gives you a breadcrumb trail of milestones. Instead of pushing ahead until everything collapses, you gain the ability to roll back to a cleaner, more balanced version.
As one audio engineer (u/turtleandmoss) put it on Reddit:
“Yeah I overcooked everything for ages. Fixing broken with different broken. Got a lot better when I just started again.”
With a snapshot workflow, you don’t need to start from scratch—you just slip back to the last great iteration. This saves time, reduces frustration, and leads to more consistent results. Your mixes stay intentional, your music improves, and your clients stay happier.
2. Detailed Instructions & Tips
Step 1: Create a Track Project for Each Mix
Start by creating a dedicated track project for every mixing job you’re working on. This will be your workspace for storing all mix revisions and A/B testing them.
Step 2: Add Mix Revisions as You Go
When you’ve made a round of adjustments and the mix feels solid:
Bounce your mix.
Drop the file into your Opusonix track project.
Opusonix automatically places new revisions at the top of your mix stack, so they’re easy to find. Each upload is timestamped, letting you see exactly when each milestone was created.
Step 3: Document Your Revisions
If you mix actively, you may accumulate a lot of snapshots. To stay organized:
Use the description field on each mix revision.
Write a short note about what changed (e.g., “Pulled back kick 1 dB,” “Adjusted stereo width on guitars,” “New vocal de-essing pass”).
This helps you, your collaborators, and your clients understand the evolution of the mix.

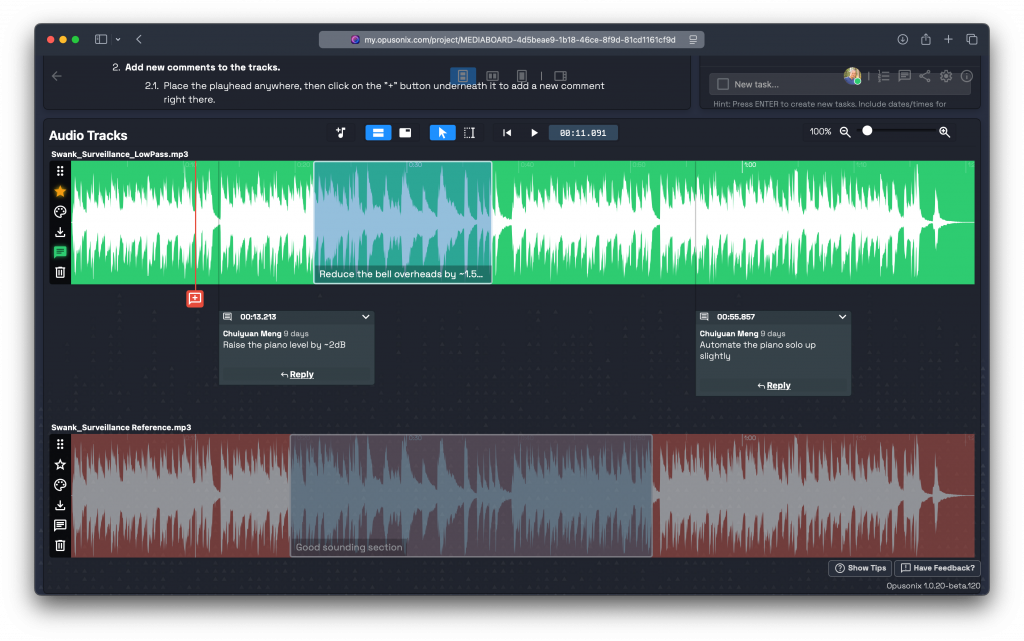
Step 4: A/B Test Revisions for Clarity
This is where Opusonix really shines.
Play back one mix revision, then hop between versions to hear the differences instantly—no DAW routing, no manual alignment, no level headaches.
A/B Testing Tips
1. Use Synced Play Markers
Set synced play markers at corresponding points across different mix revisions.
Example:
Set one marker at the beginning of Verse 1 on Mix V3
Set another at the beginning of Verse 1 on Mix V6
Now you can jump between them precisely and evaluate that section with zero friction.

2. Compare More Than Two Mixes Quickly
Hold Ctrl to reveal track index numbers.
Then press Ctrl + {track number} to activate a specific mix instantly.
This makes multi-version A/B/C/D comparisons extremely fast—perfect for determining whether that tweak you made at 2 a.m. was actually an improvement.
Try Your Next Mix Project in Opusonix
If you want to stop overmixing, trust your ears, and make your workflow more intentional, snapshot-based mixing is one of the best habits you can build—and Opusonix makes it effortless.
Give it a try on your next mix: