How to A/B Test Your Mixes: Why It Matters and 3 Best Tools for Audio Engineers (Opusonix, AB my mix, Samply)
Table of Contents
When it comes to mixing and mastering, subtle changes can make the difference between a good track and a great one. But how do you know if your latest tweak actually improved the sound? That’s where A/B testing comes in—a powerful yet often overlooked step that helps engineers and artists make informed mix decisions.
What Is A/B Testing in Audio?
In simple terms, an A/B test lets you compare two or more audio versions side by side. You might compare:
Your mix vs. a professional reference track
Two or more mix versions (for example, before and after EQ or compression adjustments)
By switching quickly between these versions, your ears can identify tonal, spatial, and dynamic differences that might otherwise go unnoticed.
Why A/B Testing Matters in the Mix Review Stage
The mix review stage is all about refinement and communication. Whether you’re working alone or collaborating with a client, A/B testing helps ensure everyone is on the same page.
Here are the main benefits:
Objective listening: Comparing versions helps you hear improvements (or regressions) without bias.
Consistency and translation: Ensures your mix holds up against a professionally mixed reference on different playback systems.
Better client communication: Clients can hear the difference between mix revisions instead of relying on abstract descriptions.
Efficiency and confidence: With faster feedback and clearer decisions, you save time and move closer to a final, release-ready mix.
Ultimately, A/B testing leads to better sonic results and a smoother collaboration process between engineers, producers, and clients.
How to Do A/B Testing for Mixes and Bounces
Let’s look at how to conduct A/B comparisons in three popular tools: Opusonix, AB my mix, and Samply.
A/B Testing in Opusonix
Opusonix makes A/B testing straightforward and efficient, especially in collaborative settings.
To compare mixes or reference tracks:
Import your mix and reference track, or upload multiple mix revisions.
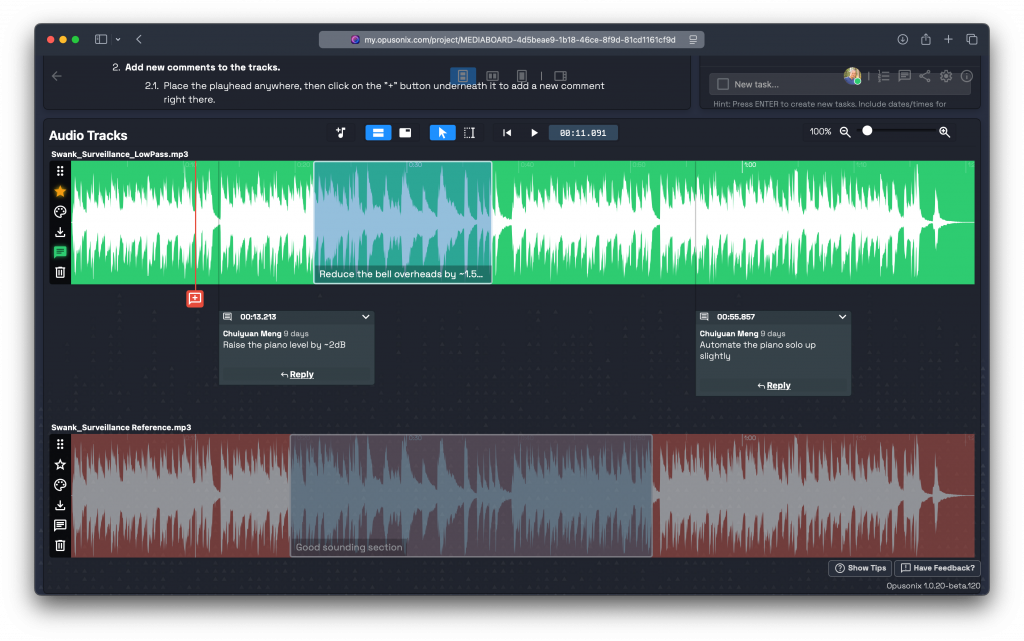
The tracks will appear side by side in the waveform editor—no extra setup needed.
As you play through your mix, use the mouse cursor to activate different tracks to seamlessly switch between them.
Tip: Want to compare specific sections (like a verse from one version and a chorus from another)?
Simply place the playhead at your desired spot.
Hit the “S” key to set a Sync Marker.
This ensures both tracks line up at the same reference point, allowing for perfectly synced A/B comparisons.

Faster A/B with the Ctrl+Number Keyboard Shortcut
If you have multiple tracks, it is easier to switch to the desired tracks using the Ctrl + Number keyboard shortcut, where the number is the index of the track. As you hold down the Ctrl key, you’ll see the index numbers showing up for the tracks. This keyboard-based track switching makes A/B test even more handy and efficient.
Collaborate effortlessly:
If you want to bring your clients into the same track project, click the Share button near the top right and enter their email addresses. They’ll be able to join you to review the tracks in real time or asynchronously. Sync markers are saved automatically, meaning both you and your client can perform the exact same A/B tests—an incredibly simple and transparent review process.
Add timestamped comments with ease:
During your A/B tests, you and your collaborators can drop timestamped comments and markers directly onto the waveform. This makes it simple to call out exact moments—like “the snare feels too sharp here” or “compare vocal clarity at this spot.” Each comment stays linked to its precise time in the track, helping engineers and clients communicate clearly without confusion. Combined with Sync Markers, this creates a streamlined and highly visual review process where feedback is both actionable and easy to revisit.
A/B Testing in ABMyMix

ABMyMix (available at abmymix.com) is another great tool for quick comparisons.
To start an A/B test:
Visit the site and drop in multiple audio files directly from your computer—no sign-up or setup required.
Once the files load, you can switch instantly between them to hear the differences.
For a more objective review, try enabling Blind A/B Test Mode, which hides file names so you can listen without bias.
Pros: Simple and intuitive interface; blind testing mode is excellent for critical listening.
Cons: If you want to share your A/B test with others, you’ll first need to upload the files to Dropbox and import them through that option—there’s no direct multi-user collaboration.
A/B Testing in Samply

Samply (available at samply.app) is designed for producers and engineers who need an easy way to send and compare mix versions with clients.
To A/B test your mixes in Samply:
Upload your mix bounces to a new project—Samply automatically organizes them in a clear, visual layout.
Add more versions to your mix. These versions will show up as individual entries.
Start the playback, and use your cursor to switch between the versions without interrupting the playback.
Samply is also very useful for client feedback rounds, making version comparison and revision tracking smooth and visual.
Final Thoughts
A/B testing isn’t just a technical step—it’s a listening skill that sharpens your perception and decision-making. Whether you’re using Opusonix, AB my mix, or Samply, the goal is the same: to make confident, informed mix choices that lead to better results and happier clients.